How To Install an Auxiliary Outboard Engine
Posted by Art Vandelay on 23rd Jul 2024
Considering an Outboard Kicker Engine? Here's How to Install It.
Auxiliary outboard motors serve powerboaters in two primary roles:
1) as an emergency get-home motor in case the big engine conks out, and
2) for alternate propulsion when the main engine moves the boat too fast to effectively slow-troll. Anglers in the Pacific Northwest and elsewhere find “kickers,” as they’re called, extremely useful when slow-trolling for salmon and trout. Sailboaters also use kickers when sailing is impractical.
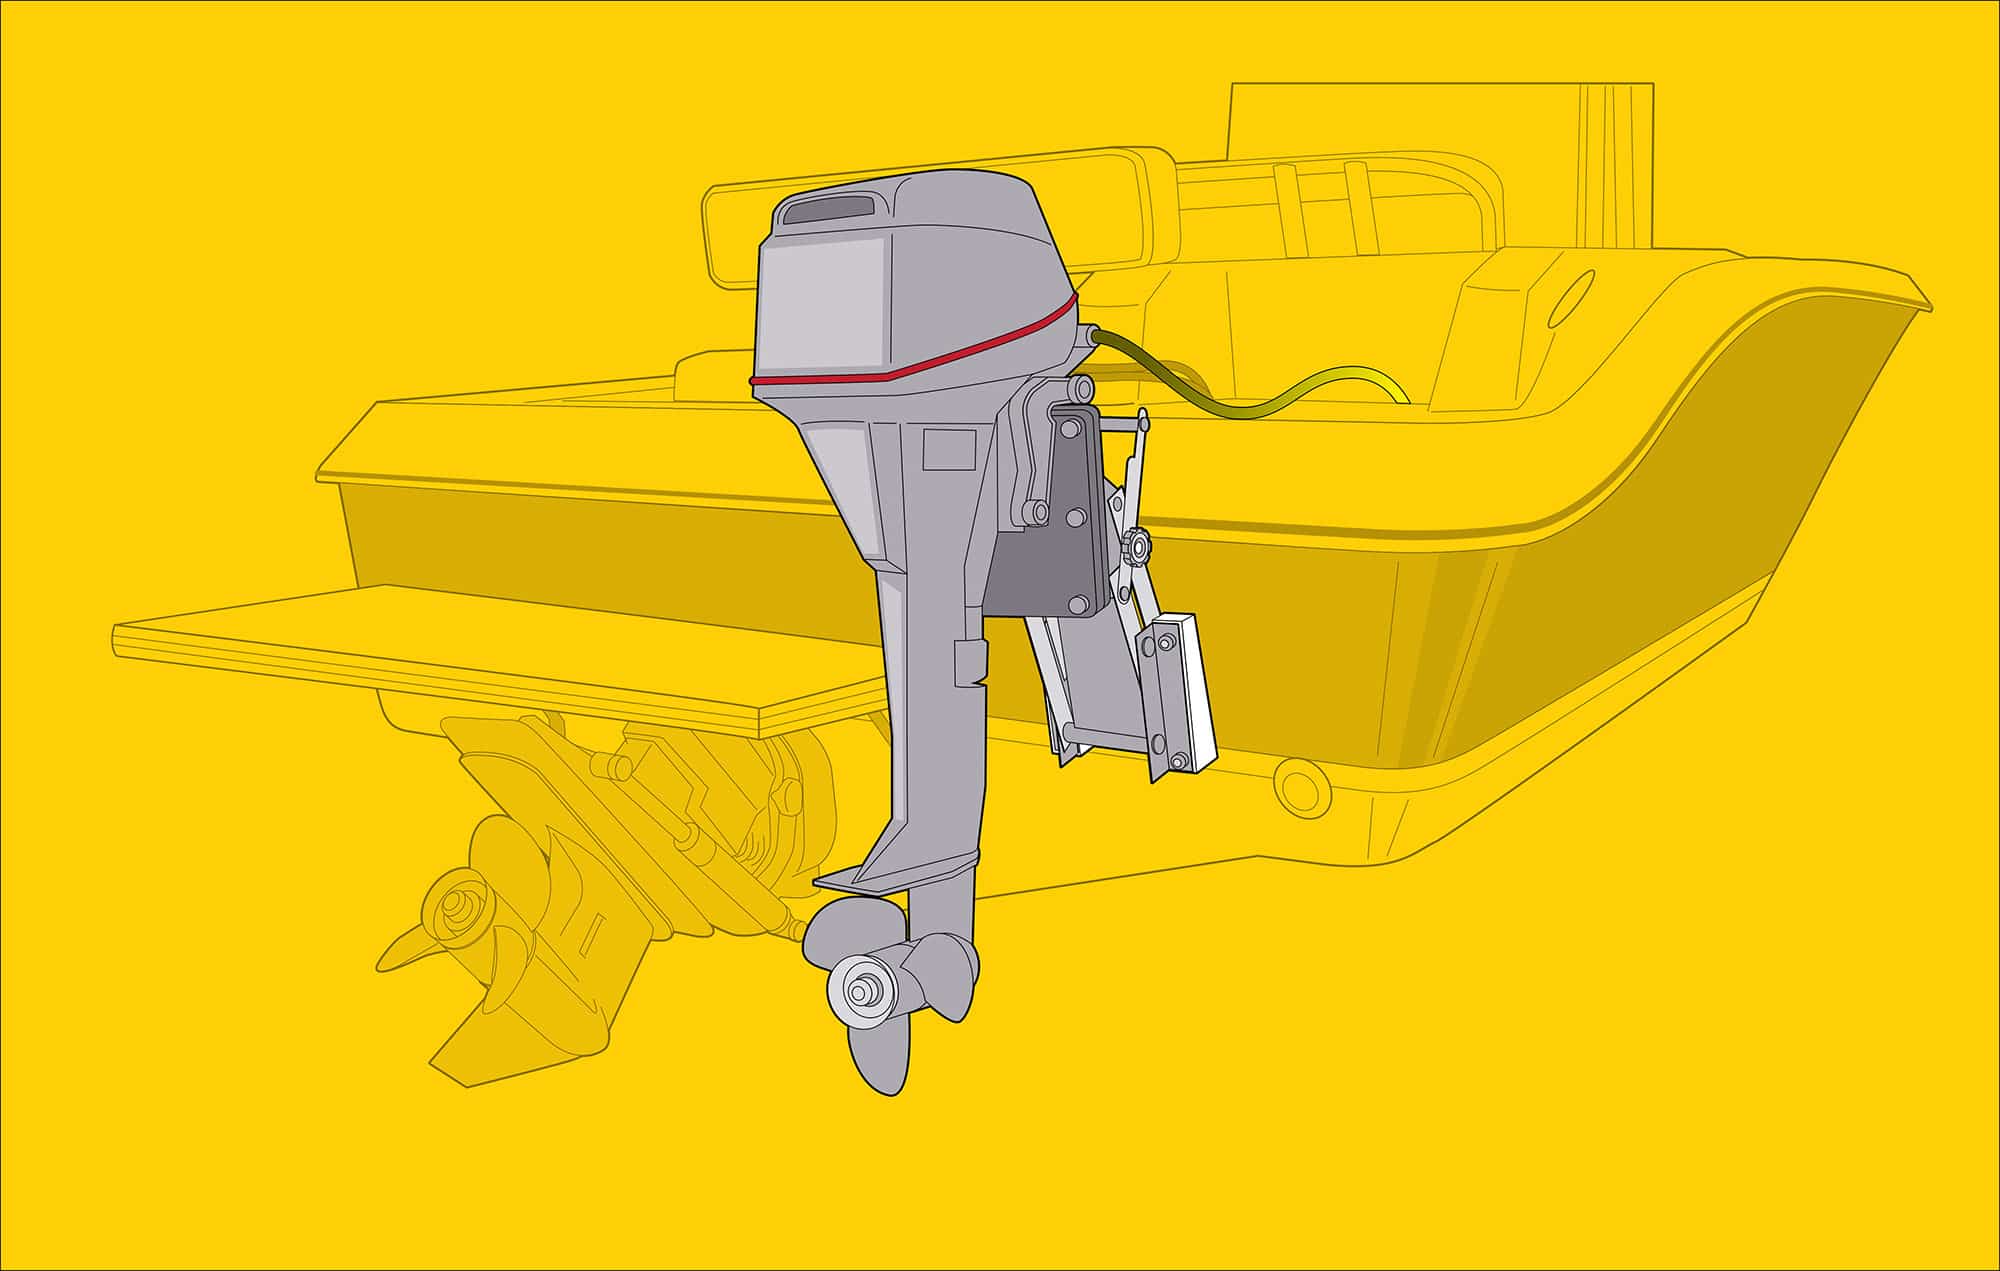
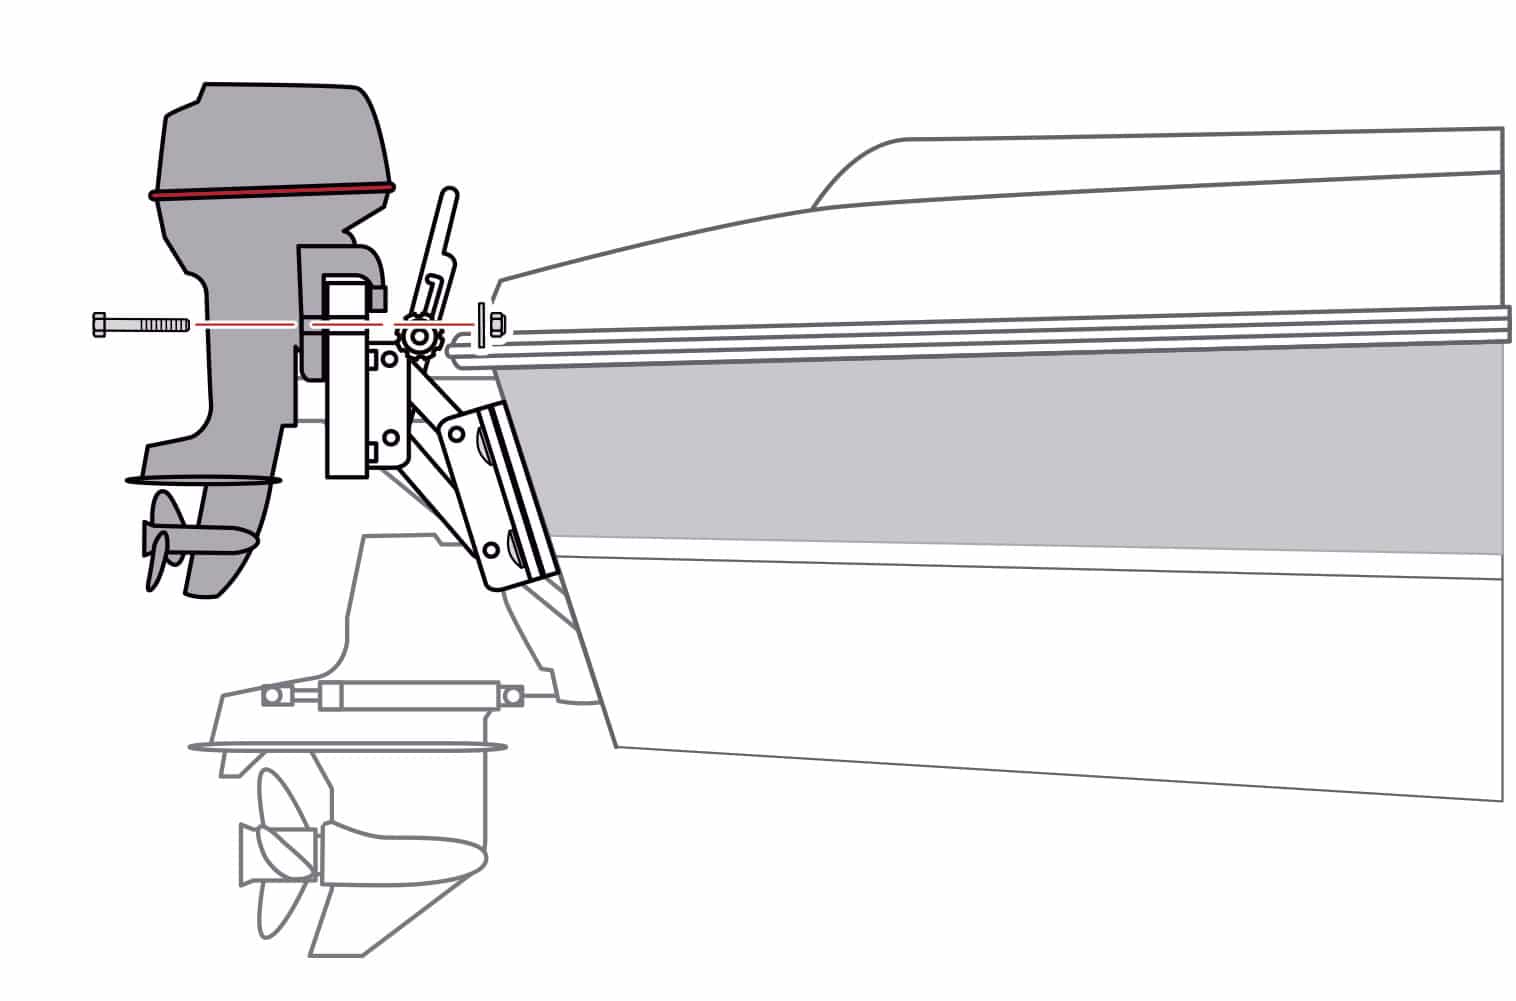
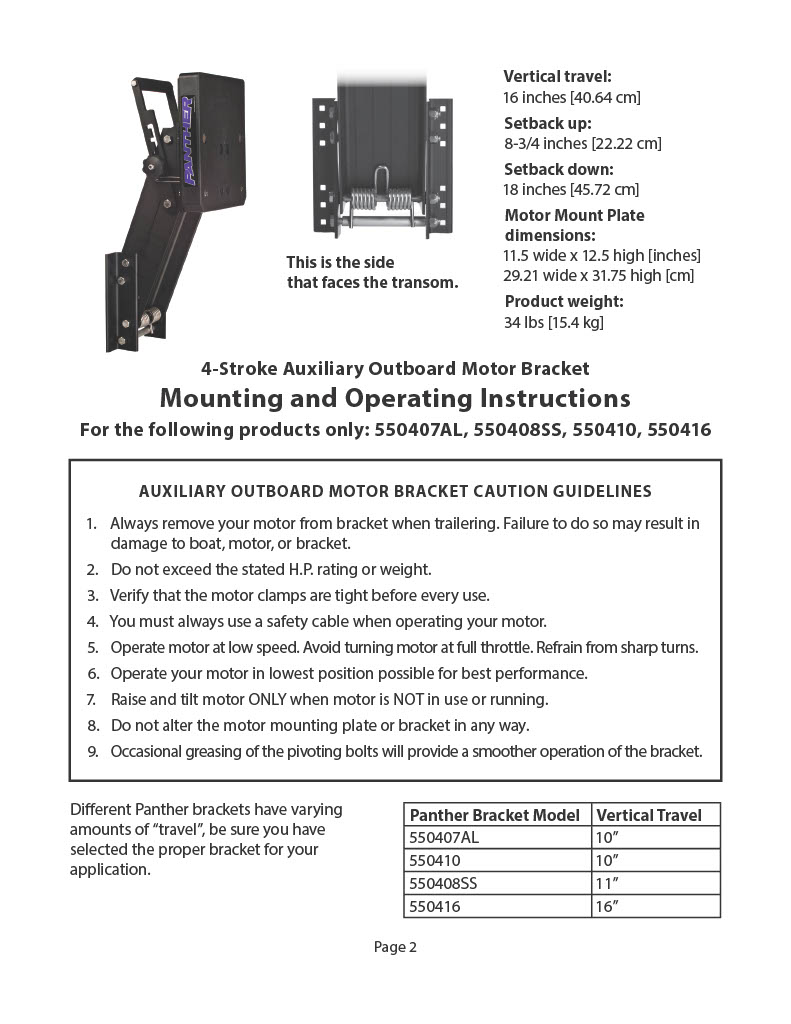
One way to carry and use a kicker is with an auxiliary outboard bracket, such as the Panther 2 & 4 Stroke Motor Bracket Part # 55-0416, which is built especially for heavier, high-torque four-stroke motors. This model can handle engine weights up to 263 pounds and as much as 35 hp, allowing you to smoothly raise and lower the motor with one hand. This bracket is hard coat anodized aluminum and is hand adjustable with the turn of a knob. The bracket offers four vertical running positions and a 10-inch lift to accommodate the boat load and water conditions. Stainless-steel hardware offers durability. We installed this bracket on the transom of a sterndrive-powered boat.
Skill Level: 3 of 5
Finish Time: Approx. 4 hours
Tools and Supplies
Panther 2 & 4 Stroke Motor Bracket Part # 55-0416 aluminum motor bracket for four-stroke motors ($509.60, obparts.com)
Drill motor and 3/8-inch drill bit Sheet of 1/4-inch aluminum to fashion a backing plate ($4.47/6-by-18-inch sheet, homedepot.com)
3M 4200 marine sealant/adhesive ($27.99/10 oz. cartridge, westmarine.com)
Four 3/8-inch stainless-steel hex-head bolts, fender washers and locknuts Stainless-steel bolts, washers and locknuts for mounting the outboard
Socket and box/open-end wrench sets
Tape measure Wooden stick Pencil marker, tape
Horizontal Measure Choose
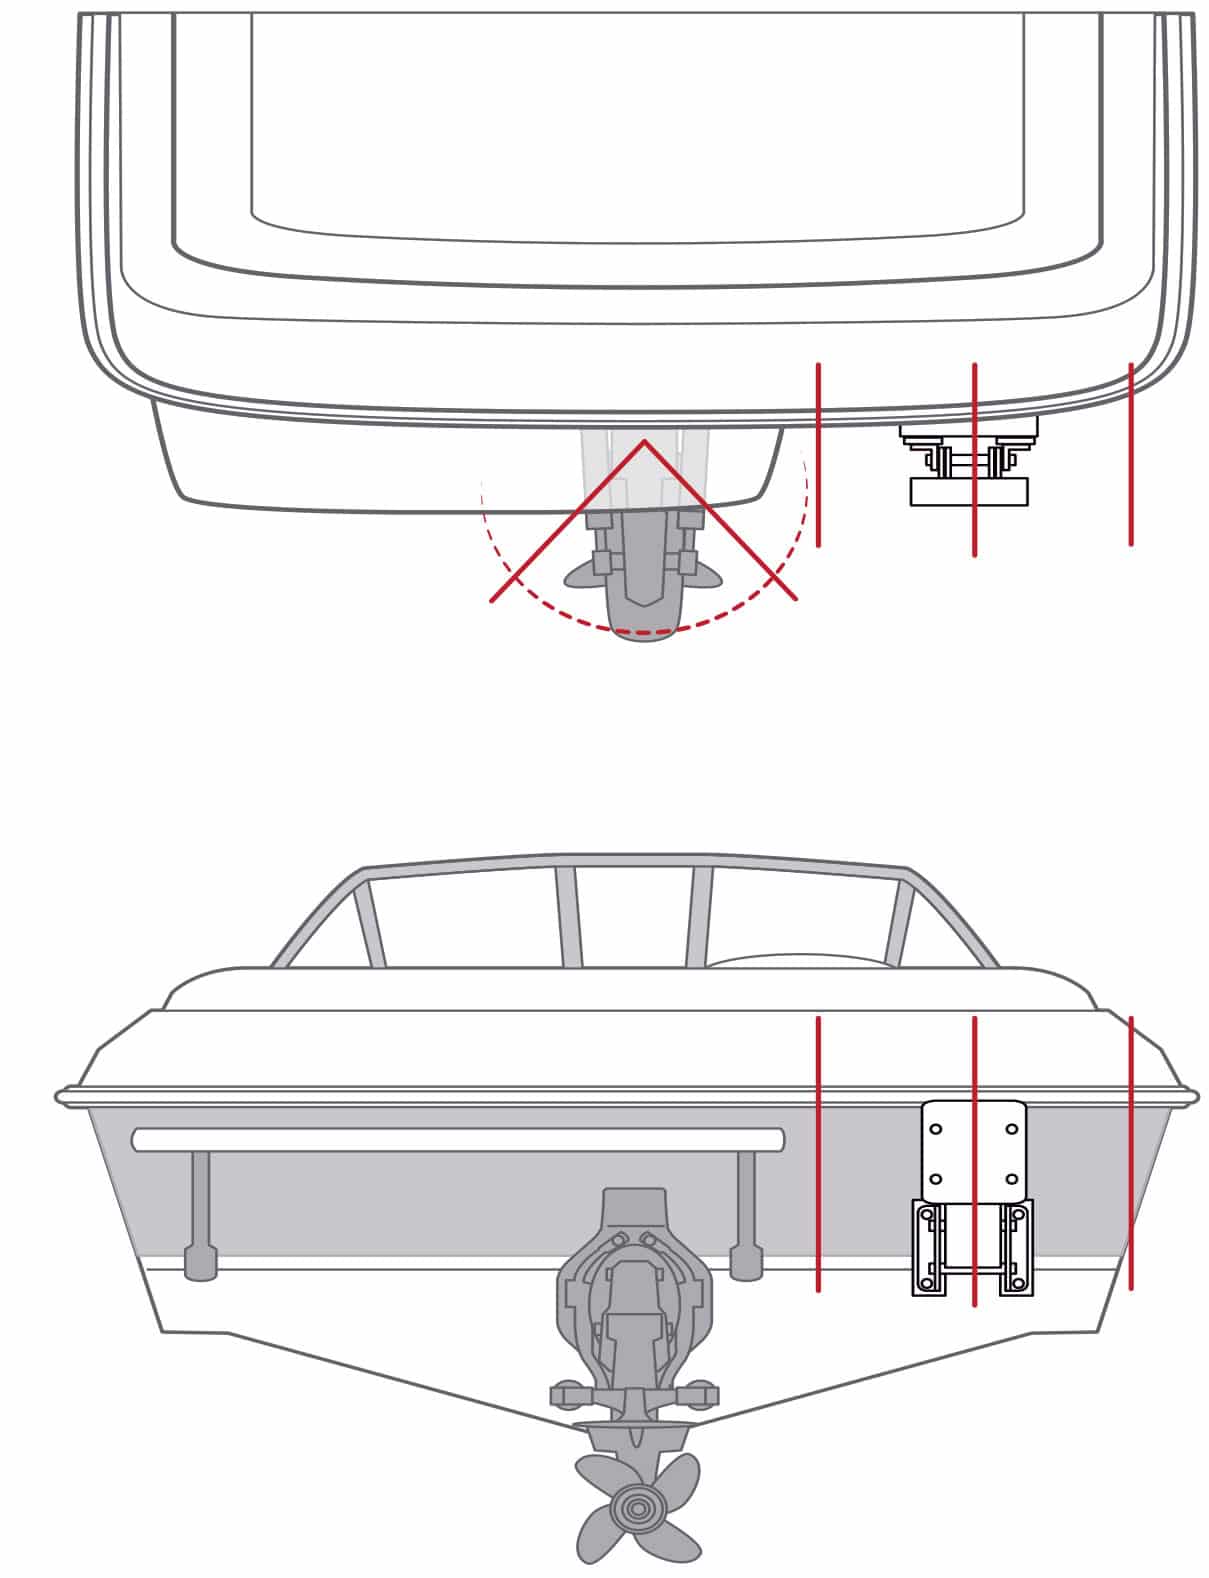
Choose the most appropriate side of the transom. Since the outboard tiller is usually on the port side of the motor, most kickers are mounted on the starboard-side of the transom to facilitate easier tiller steering and throttle control while slow-trolling or putting home. Determine a position on the transom far enough to the side so that the kicker will not interfere with the operation or swing of the sterndrive or main outboard and vice versa. Make sure the position allows for through-bolting of the motor bracket.
Vertical Measure
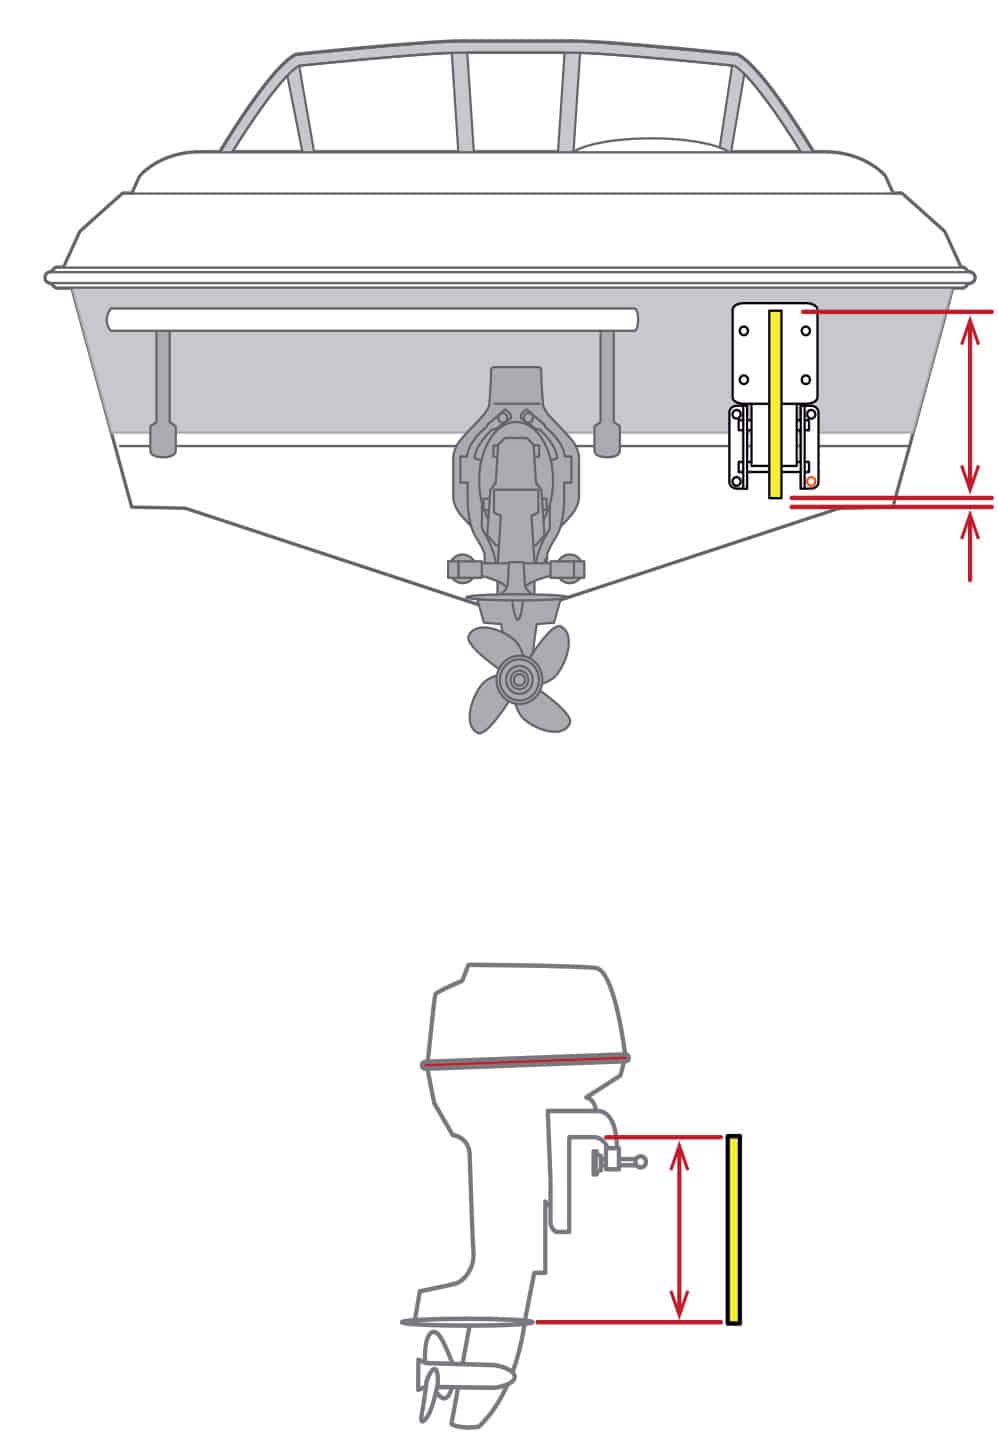
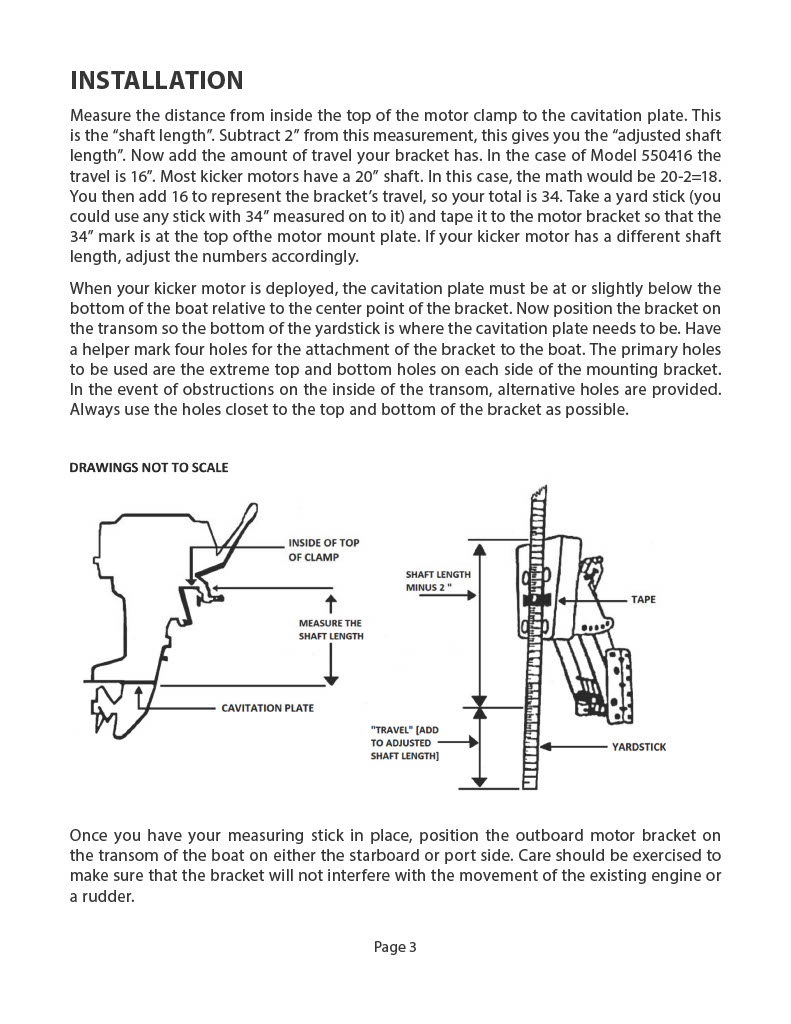
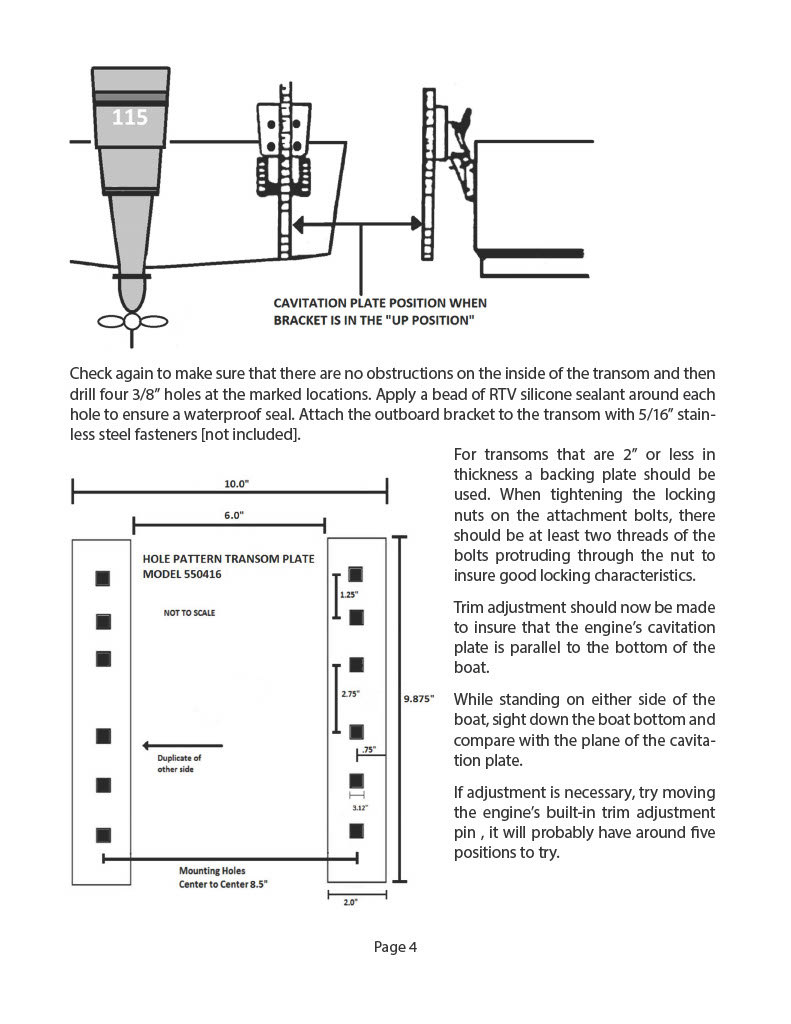
Measure the distance on your kicker between the anti-ventilation plate and upper inside edge of the outboard clamp. Subtract 2 inches from this length, then add 16 inches (vertical travel for the model 55-0416). Cut a wooden stick to this length and tape it so the top is even with the top of the poly mounting board. Place the mounting flange on the transom so that the center of the stick is 1 inch above the bottom of the hull (for powerboat installation) and mark the location for the mounting flange on the transom.
Mark and Drill
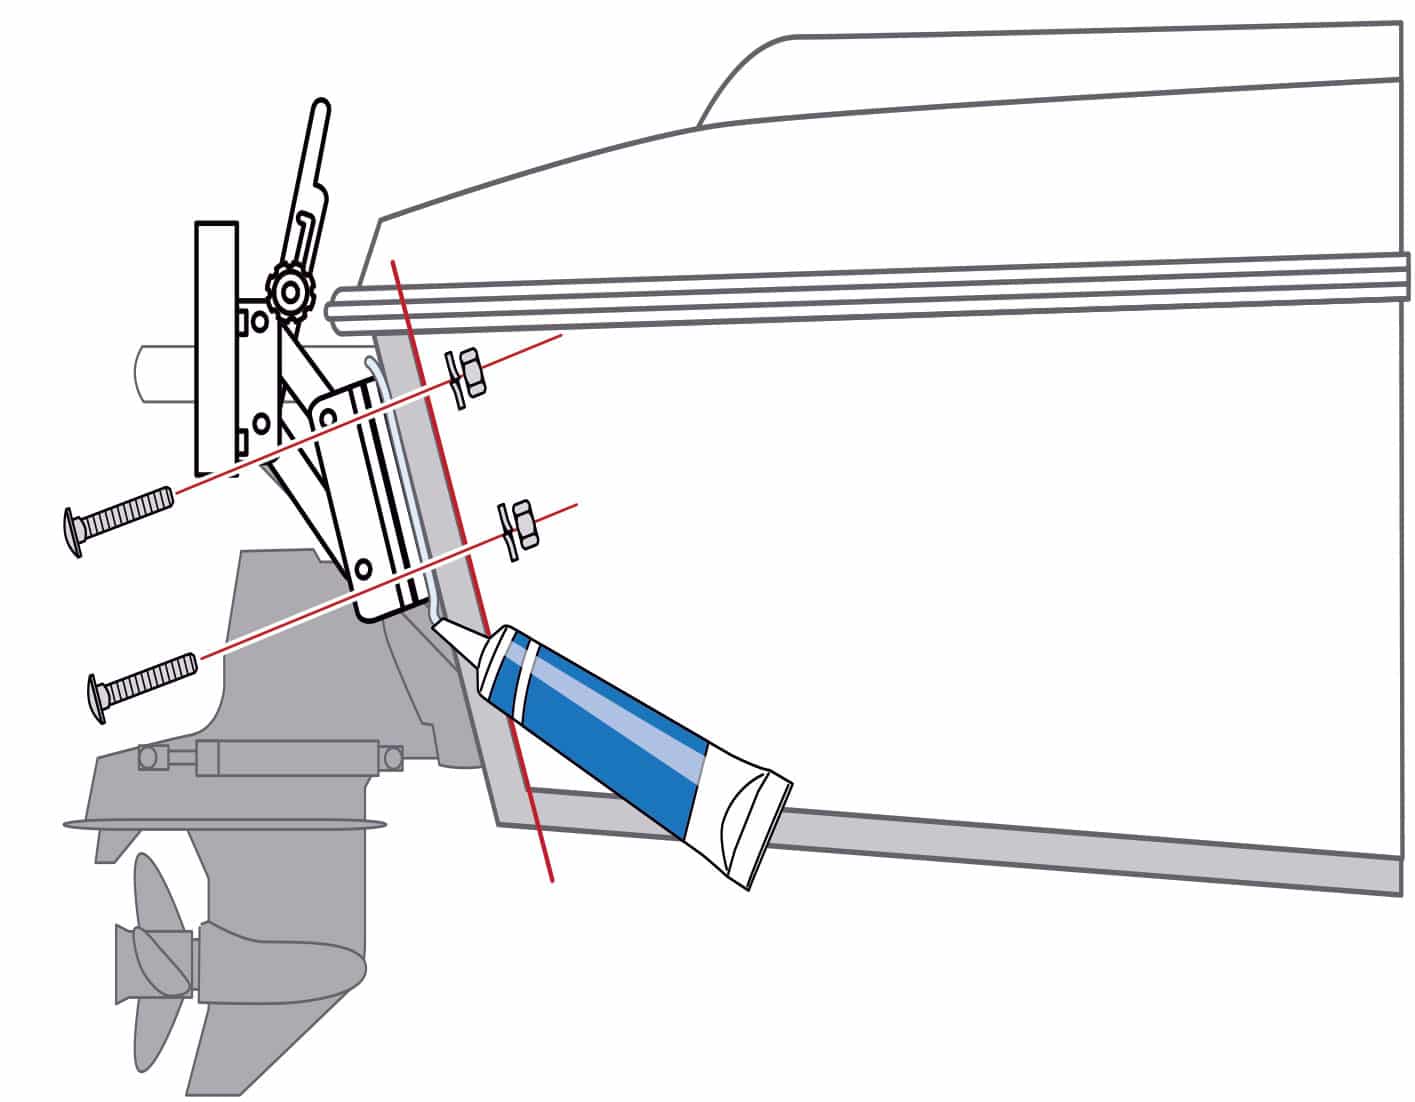
Make sure the top of the mounting flange is square with the upper edge of the transom. Using the flange as a template, mark the four outside hole locations. Be sure you have access to the backside of the transom for through-bolting. If not, choose one of the alternate bolt holes in the bracket (there are three holes in each quadrant). Check for interference from hoses and wires on the inside of the transom before drilling. Drill the four 3/8-inch holes, each at a right angle to the transom.
Install the Bracket
Mounting hardware is not supplied. Buy four 3/8-inch-diameter stainless-steel mounting bolts, long enough to reach through the transom with enough room to accept fender washers and locknuts. Panther also recommends using a backing plate inside the transom. Coat the inside of the mounting flange and backing plate with a marine sealant such as 3M 4200 and squeeze some in each transom mounting hole. Bolt the bracket securely to the transom (you will need a buddy to help you tighten the bolts).
Mount the Motor
Many small outboards come with clamp brackets, but these can vibrate loose over time, risking loss of your kicker. So don’t rely solely on the clamps. Secure the motor by using the lower mounting holes on the outboard bracket to through-bolt the motor. The Panther mounting pad comes with mounting holes for this purpose. Use stainless-steel bolts appropriately sized to fit the outboard mounting holes. Secure the bolts with fender washers and locknuts. Panther recommends against trailering with a motor on the bracket.

<